Monday, March 13, 2017

Mudroom Makeover on a Budget

We had left over tiles from our lake house projects and we had been wanting to tile our mud room at our home for at least twelve years. Saddled with tiling experience from the lake house we purchased the mortar and grout to accompany our tiles. This is what we started with...


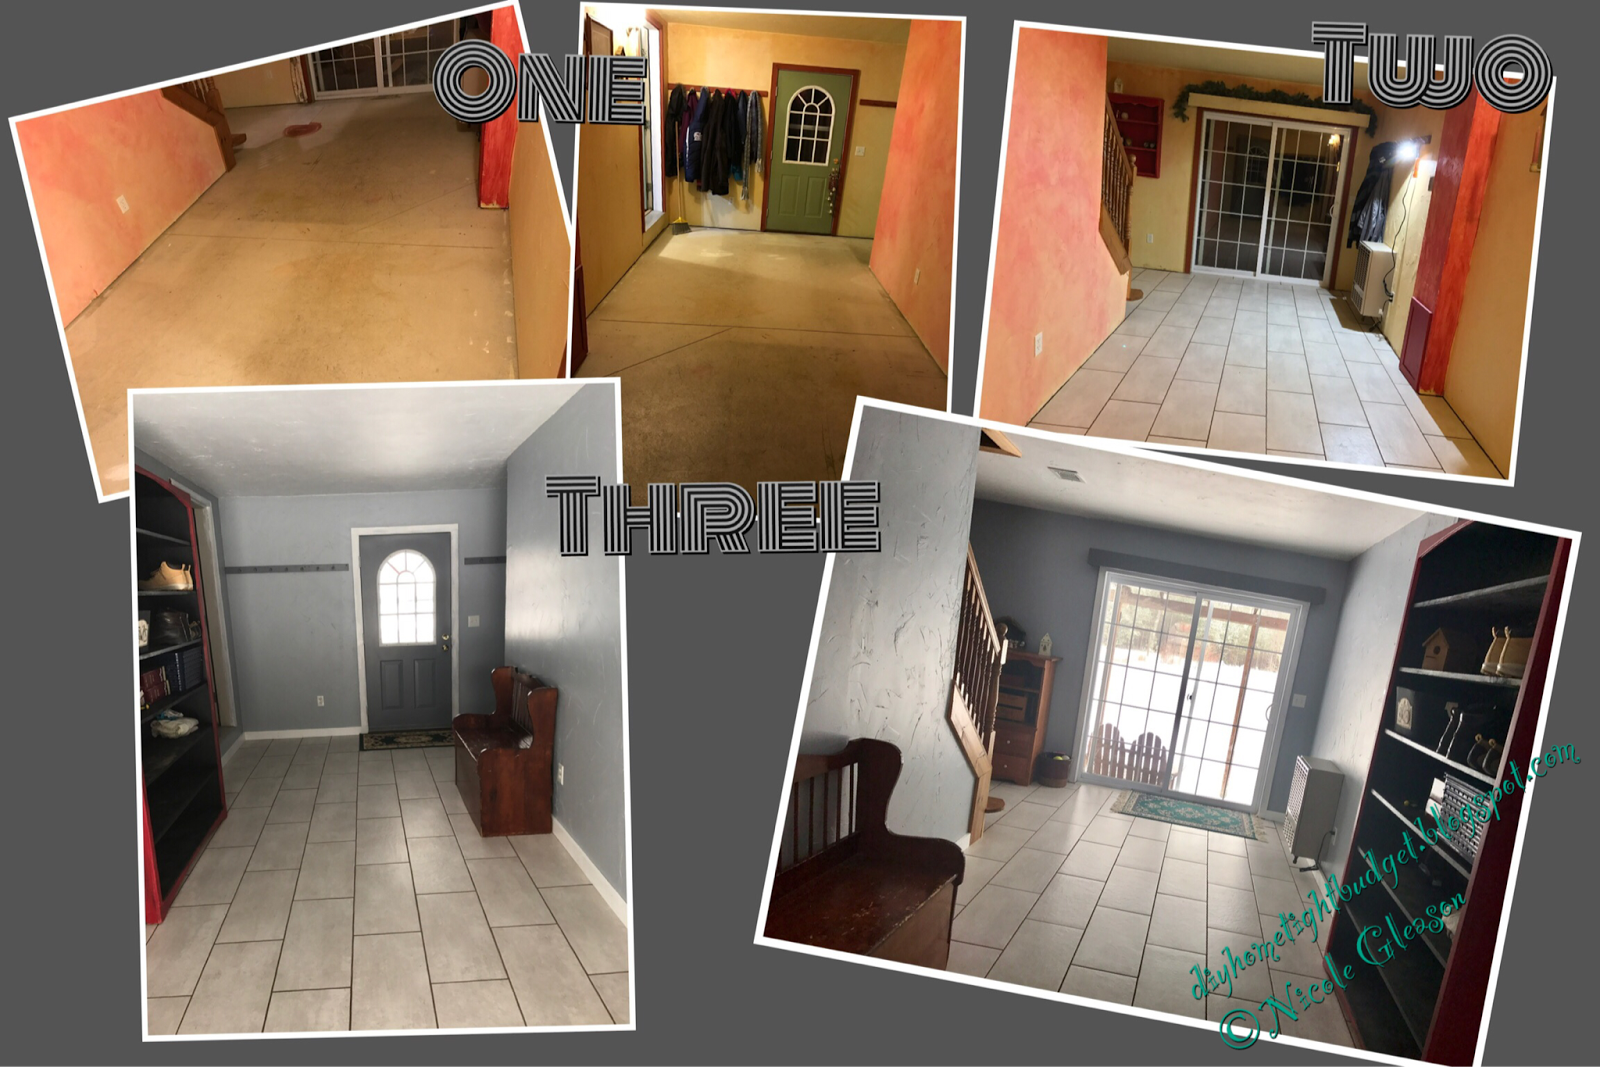
Tiling on concrete was a tad easier because the subfloor was ready to go. We did not have to add cement boards. If there are low spots, you should level them out with concrete leveling. 


We laid out a few rows of tiles to take measurements in order to figure out the best starting point. It turns out that the width of the room was even from wall to wall for complete rows. It is not recommended to start along a wall, however in our case it made a lot of sense to save time and tiles. We only had a certain amount of leftover tiles and we were crossing our fingers that we would have enough to complete the room.
So for very little money we tiled the mudroom and painted it. It is amazing what a little paint will do to freshen up a room!


Sunday, March 5, 2017

Modern Farmhouse Bathroom: Part 1

Modern Farmhouse Bathroom: Part 1

This post will be a two part series. The work done so far was done 
during a week off during school vacation. A bathroom renovation 
instead of vacation! My husband calls it a renoCation.


The fun stuff... demolition!


We put the reciprocating saw to good use.


Clay cut through the studs to create a place for the insert that will be a nice shelf for shower supplies.

Before the cement board is attached, the walls need to be shored up with support for any place that there will be a seam. Plus you need to get all of your plumbing set and frame out any inserts that you may want.

We wanted to create an in-wall shelf system to hold bathroom supplies. A much needed addition to a space with limited storage! Clay cut out the 2x4 going through the center of the opening. Then we attached 2x4 support all around the edge of the opening.


Once we cut out the space we measured the opening and created a box using 1x4s. I attached the trim, sanded, primed, and painted before attaching the insert into the opening.

We purchased a rough cut 4x6 hemlock ($20) post to frame out the opening for the toilet area. I needed a flat surface near the ceiling to attach the sliding barn door that we will build. We rip cut the post to save money and to save on not eating in too much of the entry space. 


Next we set out tiles and cut the ones that needed cutting, prepped with some thin set, layed the Wonderboard, taped and filled the seams, slapped down more thin set, layed the tiles, washed away the film with a wet sponge, once dry wiped the tiles with a dry rag. After 24 hours we could walk on the tiles and I washed them with a vinegar and water mixture.


We cut ship lap to the length that we needed to fit on the wall behind the bathroom sink. Then I sanded, primed, and painted the ship lap.


Start at the floor, check for level, and use finish nails or screws to attach ship lap to the wall. I drew a line on the drywall to locate the studs easily. I used a quarter and a nickel to space the boards evenly. 

Once I got to the light holes, my husband drew a circle for the space and cut the hole with a jigsaw. 


I absolutely love the look of ship lap. I filled all of the nail holes with white wood putty and added one more coat of trim paint. ($60 total plus I have left over ship lap for another project.)

Once the paint dried Clay installed the lights. Exterior lights work well and you can find more rustic options. $30 at Home Depot.

$200 for all flooring materials.

We purchased the bathroom cabinet and vessel sinks at IKEA. This is one of the more expensive parts of the remodel. 


The cost of the vanity was $349, the bamboo counter $110, and the vessel sinks $100 each. All purchased at IKEA. Not in photo... we purchased oil rubbed bronze faucets for $89 each from Home Depot.

1/2" Wonderboard needs to be installed on all of the walls and inserts of the shower. Make sure to use the screws that are made for cement board. Use tape and mortar for all of the seams.
($100 total)

Clay purchased a shower pan on-line from Home Depot for $570. We spread the mortar and placed the pan in place. Then added the drain piece.


We built a half wall using 2x4s and purchased a cedar beam ($80) that we are connecting to the floor and a truss above the ceiling to give the half wall more support.

This is where we ended after our week off from our professions. The rest we will find time to complete during then next few weekends. Time to go back to our day jobs!


Saturday, June 4, 2016

A Teenager's Dream Bedroom: A Loft Bed with a lot of Closet Space Underneath

This bedroom may be the most dramatic room update at our camp. All rooms underwent a huge transformation, but this room would make me cringe when I entered it. Now, even though it is not my bedroom, I find myself lounging in my daughter's chaise looking out the door onto the lake and I feel relaxation take over.


The mess of a room that we started with!


We called it the blueberry room... among other names.


In order to replace windows in all of the camp we had to remove the sheet rock around the sill. This room was no exception, however in this room we resized one of the three windows and changed out another one for a glass door.

We built a frame using 2x4s to create a raised bed.

There was a lot of holes in the wall that we had to fill in with joint compound including the section where we made a window smaller.


I sanded and painted before we fully attached the bed frame.

For character my husband and I put up at least one pallet wall in every room in the camp. This room is finished with three.


I stained the pallet wall with Early American Minwax and used three coats of Polyurethane since I wanted the sleeping area to be nice and smooth for a variety of reasons.


We had our electrician add a light and an outlet that also has an USB charger built in. 

We removed the window and framed out a space for a door.

A view from the outside.

We followed the manufacturer's instructions for installing the door.

Until we built steps, we had to board in the door. We also began to tile the floor and cover the bed frame with pallet wood.


We trimmed out the windows and doors with 1x4s and built a ladder with 2x4s.


We built a closet underneath the raised bed since this room did not come with a closet. This section is to hang clothes from. We used 2x4s, galvanized piping, 1x? boards at the correct width, pallet wood, and 6 casters.


As we built the sections I stained and added pulls to them.


We made the middle section into a book shelf.


I am extremely proud of this project!